Azure Application Proxy is a service in Azure that allows an internal application to be presented to an authenticated user without the need for the user to be connected to the network, such as via VPN.
This paper covers creating a connection to an internal web app running in IIS on a Windows server. There are many variations on this setup that have some different steps/options, but the goal here is to show a working model and provide some troubleshooting steps for Kerberos or other errors. This paper also only covers creating the project using the Resource Manager Azure Portal and does not use the Classic Azure Portal at all. The web app will be presented to an external user after that user is authenticated via Azure Active Directory. There are a few pieces to this setup that will be covered.
- The internal application on IIS
- The application proxy server(s)
- Registering the application in Azure AD
- The application proxy service in Azure
- Kerberos setup for delegation
In this scenario, there are a few assumptions:
- You have both an Azure subscription and a basic or premium Azure AD subscription.
- The internal application is using Integrated Windows Authentication (IWA)
- The application runs from IIS on a domain joined internal web server.
- The Azure IaaS subscription is connected to the internal network via VPN or Express Route.
- The internal Active Directory is synchronized with Azure AD and both copies of AD use the same User Principal Name value (such as email address)
The following ports need to be allowed for Outbound connections (no Inbound ports are needed)
| Port Number | Description |
|---|---|
| 80 | Enable outbound HTTP traffic for security validation. |
| 443 | Enable user authentication against Azure AD (required only for the Connector registration process) Enable the connector bootstrap sequence and automatic updates Enable communication between the connector and the Azure service for incoming requests |
| 10100–10120 | Enable LOB HTTP responses sent back to the proxy |
| 9350 | Optional, to enable better performance for incoming requests |
| 8080 | Enable the connector bootstrap sequence and connector automatic update |
| 9090 | Enable connector registration (required only for the connector registration process) |
| 9091 | Enable connector trust certificate automatic renewal |
Part 1 – Internal application
The application setup is the easier part, but can cause issues with the connections depending on some settings. Other protocols, such as OAuth2, can be used with application proxy, but this paper only covers using Kerberos Delegation and the sample IIS app is using IWA for authentication. We will call the app MyWebApp.company.com for this sample.
The web app has Negotiate set as the first protocol for access. NTLM is also enabled but is second on the list. One other item to check is the Kernel Mode Authentication. Because App Proxy uses pre-authentication it is possible the having Kernel Mode Authentication enabled could generate an HTTP 401 error. Disabling Kernel Mode Authentication should take care of this and there is a Microsoft article on this topic at this site.
Part 2 – The Application Proxy Server(s)
You will need Azure AD Admin access for the portal-based steps of this section.
To use Azure Application Proxy you are required to have one or more internal application servers running the Azure Application Proxy Connector. This runs on the machine as a service and is used to communicate with Azure Active Directory. To install the connector you first need to download the installation package from your Azure Portal.

Once in the Application Proxy area of AAD, you should find an option on the top bar to download the connector.

If this is your first time using Application Proxy you will also need to create a New Connector Group. A Connector Group contains the list of Application Proxy servers to which you have installed the Connector service. Groups can be set up for different divisions/departments within your organization allowing for greater separation of applications if desired, but they all will connect back to the same Azure Active Directory.
Once you download the connector.exe you should find the installation file in your download directory.

Just copy this file to the server you want to use as your Proxy server, or create a new VM in Azure for this purpose. The Application Proxy server can exist either on premise or in Azure (assuming you are connected to your Azure VNet via VPN or Express Route). The installation is very quick and simple and you can look in the Services Panel after the installation to verify that the services are running. If you are blocking outbound Internet traffic then the service will not be able to auto-update, so I would suggest tunneling your internet traffic through your VPN to your organization or using a Network Security Group to enable outbound access (required ports are listed at the top of this paper). Inbound Internet access is not required and you can block all inbound internet access and still have this work.
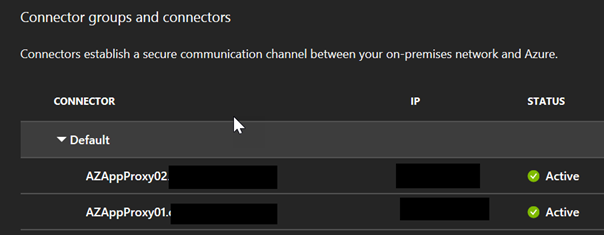
During the installation you will be prompted for the name of your Connector Group. After the installation you can refresh your Portal blade and you should see your server(s) listed. It is generally good practice to have more than one server in a group for redundancy. For the sample I have created two servers with the generic names of AZAppProxy01 and AZAppProxy02.
Part 3 – Registering the application in Azure AD
You will need Azure AD Admin access for this part as well.
In your Azure Portal AAD section, click on the App Registrations item just above the Application Proxy settings.

At the top of this blade is a New Application Registration option.

Click the New App Registration option and enter your information on the next screen. Below is one with the sample data mentioned earlier.

You should now see your app on the list on the Registration blade.

At this point your application will appear both on the Application Registration blade and the Enterprise Applications blade. Each location controls different aspects of your application setup. The Registration blade will have settings available to configure how your application interacts with Active Directory or other APIs from Microsoft (or others potentially) and other items such as Reply URLs.
In the Settings section you should set an Owner for your application and any appropriate Reply URLs for your app. If you are missing a required Reply URL, you will get an error when you try to connect that will tell you that you are missing an expected reply and the error will list the URL needed. If you do see this you can copy the URL from the error and add it to your list of Reply URLs.
Under the Required Permissions area it is very likely that you will need to grant your application some AD rights. In that section you may see something like this:

If you do not see the Windows Azure Active Directory item as above, you can click the Add button at the top and select it. In this sample it shows 1 delegated permission, normally your proxy app will need to at least read the user’s basic profile to delegate on that person’s behalf. These are the options in this section.

The Application Permission will likely need Read Directory Data and the Delegation area may need Read Basic or Read Full for the User Profiles. Please read up on these options at Microsoft.com and be sure to follow the rule of least permissions. If you do not set any permissions, you may see an error when you connect through your browser, and if you are an AAD Admin you will be prompted at that time to assign permissions to the application.
Whether you assign permissions manually at this point or wait until prompted to do so when connecting, you will need to return to this area in the portal and click the Grant Permissions button to apply the permissions for all users.

While this paper does not cover OAuth2, if you are using OAuth2 and need an application Id and Key, you can find both in this area. The Application Id is listed on the left-hand blade or under the Properties topic. The Key can be created via the Keys item on the list and in here you give the key any name you like and set the expiration to 1 year, 2 years, or never. When you save the key the actual Secret Key will be displayed. Be sure to copy this key at this time as you will never see it again. If you do copy it incorrectly, you can of course delete the key and make a new one and try again.
Part 4 – The Application Proxy Service in Azure
After making any setting changes in the Application Registration area, you should navigate to the Enterprise Applications section and find your application on the list under All Applications.


You should see the following list of options.
 *Note the Single Sign-On option is not visible yet as the Application Proxy section has not been updated.
Your overview page won’t have much information yet as you haven’t tried to use it yet. On this blade you will configure application access by user or group (including an ‘everyone’ group if you have one). You can verify your application proxy settings here and make any needed changes including adding an SSL certificate if desired. Self-Service will allow you to set up some rules related to allowing users to ask for application access and if that is granted automatically or if it has to be approved by an application admin. Self-Service also allows you to add an application role to a user when they request access, assuming you have defined some roles through the application Manifest (found back on the App Registration blade).
Conditional Access is a great feature that gives you a lot of control over how you allow access. You can setup rules such as ‘all users must be on an Intune enrolled device to access this app OR use multi-factor authentication’.
The Permissions area should give you a summary view of the application permissions that were set up in the previous blade, such as reading AD user profiles.
The Sign-in and Audit Logs are useful for tracking users and testing access. If you receive errors when accessing your app, you can check the Sign-Ins section and see if you are getting to App Proxy successfully. If you see Success here, then your issue is likely within the source app or between the proxy server and the app server.
Part 5 – Kerberos Delegation for Azure App Proxy
This topic is the most common area to introduce connectivity issues. If set up correctly it works well, but if you miss one step or make an incorrect setting you will receive authentication errors.
For this area internal domain AD admin rights are needed.
To keep this simple we’ll break it down into two parts.
o Service Principal Name
o AD Delegation
Those are really the only parts to this. The first one is about registering an SPN for your app/website within your on premise Active Directory. Assuming our app is MyWebApp.Company.Com and we run the app with a service account called company\MySvcAcct then the syntax would be:
SetSPN -S HTTP/mywebapp.company.com company\MySvcAcct
The -S is used to add the item to AD, but it has the added benefit of checking for duplicates first. If it finds that app registered already then it will quit with an error stating that this is a duplicate. If you only use one domain, then you can likely get away with just listing HTTP/MyWebApp without the FQDN, but it doesn’t seem to hurt to include it so I usually do. There is no HTTPS used with SPNs, only HTTP, so it is safe to use HTTP even if your proxy URL includes HTTPS. To verify this entry you can use the -Q flag to query AD.
SetSPN -Q HTTP/MyWebApp.company.com
This will show you the SPN(s) that are registered (you can use HOST and other prefixes other than HTTP so there can be multiple for the app/site), and it should list in the response the service account information, typically in an OU=xxx format. If you register the SPN against the wrong account or if you use HTTPS or some other setting and you want to remove it the -D flag will Destroy the entry.
SetSPN -D HTTP/MyWebApp.company.com
Re-querying the SPN should show this entry no longer in existence in your AD.
Once the SPN is correctly established the only remaining part is to open the Active Directory Users and Computers app from the Service Panel on any machine where it is installed. In AD Users and Computers you will need to navigate to the OU that contains the server(s) to which you installed the Application Proxy Connector in Step 1. Once you locate that computer entry, just right-click on it and select Properties. In the Properties dialog click on the Delegation tab.

On this screen to add a new application, just click the Add button. On the next dialog you can enter the name of the service account to which the app is registered and see a list of items attached to that account. Select the HTTP/MyWebApp one and click OK. You should now see an entry like the screen above (minus the blacked-out area) with your application listed. The sample image lists two web apps.
You can change this to Kerberos only if you will only ever use Kerberos, but if you plan to add some other protocols later, even NTLM, it is better to leave it at Use Any Authentication Protocol. I would avoid using the second radio button ‘Trust this computer for delegation to any service (Kerberos Only)’ as this would allow delegation to any server in your organization and you might have some unexpected results.
Next reboot your App Proxy server(s), the server needs to pull down the updated AD information and a reboot will force this. If this is an Azure VM, just click the restart option on the VM blade. Rebooting the app proxy server each time you add a new delegation will save some headaches and troubleshooting.
One final step is to return to the Azure Portal to make one setting update related to your SPN. Navigate to the Enterprise Applications section and then All Applications and find and click on your app. You should see a Single Sign-On option, click on that. (If you do not see Single Sign-On as an option, check the Application Proxy option and make sure the internal and external URLs are listed) In here it will likely default to Azure AD Disabled. Change this to Integrated Windows Authentication and enter the SPN for your app, you can normally leave off the .company.com part, but if you see an issue you can try adding that back on. It should look like this.

Click the Save button on the top and navigate to the Application Proxy setting. You should see your app listed, if any parts are missing, fill them in at this point. The suffix used is created when first create your proxy group mentioned in Part 2, and is generally -something.MSAppProxy.Net, that last part is controlled by Microsoft, but you can create a CName in your DNS system for a more user friendly URL.

Be sure to use Azure AD for the Pre-Authentication, leaving it at Passthrough is not recommended. Now you should be able to use the App Proxy URL to connect remotely to your application.
Common Errors
There are some common errors you can see with Azure App Proxy including 401 access denied, 403 Forbidden, and a variety of AZxxxx error codes from Azure. In general, if you see an error with an AZ prefix the issue is within your Azure App Proxy setup, if you see 401 or 403 it is something between App Proxy and your App, or internal to your app.
401 can be caused by
- Not having Negotiate listed first in your IIS app’s authentication protocols
- Having Kernel Mode Authentication enabled in your IIS app
403 can be caused by
- Using the wrong service account when creating the SPN
- The user not having access to the internal app
- The user not having access to the app via App Proxy (set in Users and Groups in the Azure Portal)
AZxxx errors can be
- Missing permissions to Azure AD such as ‘read basic user profile’
- Having an invalid URL in the App Proxy definition
- Not listing the correct SPN in the Single Sign-On section
The dreaded message is ‘Incorrect Kerberos constrained delegation configuration in your on-premises Active Directory.’. This is normally a problem with your SPN setup. Run SetSPN -Q HTTP/myapp.company.com to check the current settings. If it says that it can’t find an entry, then have an AD Admin create it with the -S flag. If you see an incorrect entry have an AD Admin remove it with the -D flag and add the correct value with the -S flag.
If everything looks fine with the SPN, check the Delegation tab of the server properties in AD Users and Computers and make sure you have it set up as shown in Part 5. Also, if you just recently updated the Delegation tab, be sure to reboot your App Proxy server.
I hope that helps someone who is struggling with this setup as I did at first. Once all the pieces are in place it is a great solution and great technology with the potential to reduce or eliminate the use of DMZ subnets.
There are variations on this setup of course, including other protocols or non-IIS applications. Even SharePoint can be set up to use App Proxy, but it takes a few extra steps on the SharePoint side. Please post any questions and I’ll do my best to answer them.
